MOTORCYCLE WINTER STORAGE TIPS


Motorcycle riders are known for their rituals. Those ritualistic tendencies come out when the riding season draws close. Most riders take one last big epic ride before they park their bikes for the winter and freezing temperatures.

Any doubts can be answered in the owner’s manual which came with your ride or online or with the motorcycle storage tips below. And after one successful winter, every winter after that will be much

“Riders start bringing their bikes in for winter storage and custom design work right after Labor Day.”

Some riders see winter as the ideal time to make motorcycle customizations or enhancements they have meant to get done. Some riders drop their bikes off at dealerships in the winter and pick up their transformed custom pieces in the spring.

If you enjoy the ritual and want to self-storage it alone, here are essential tips to prepare your bike for winter storage.

How to Winterize a Motorcycle for Storage
A proper motorcycle winterization checklist helps ensure your motorcycle remains in good condition and is ready for use once the warmer weather returns.

Here’s a step-by-step guide for how to store motorcycles for winter:

Fluids
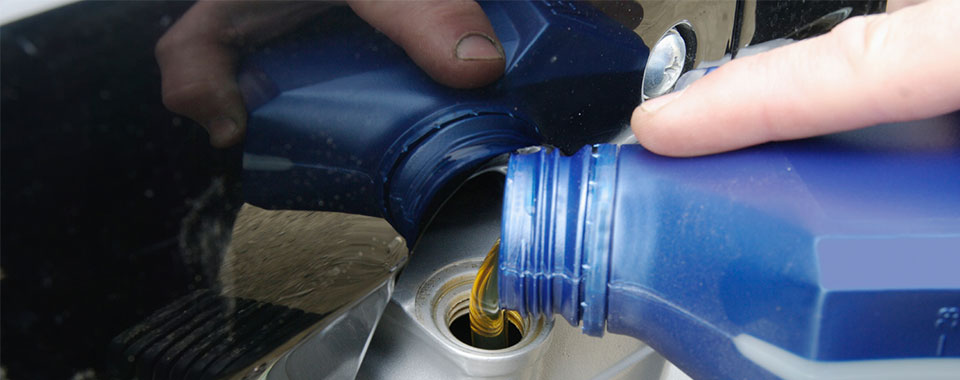
Freshen up those fluids. That means all of them: motor oil, clutch, brake, and coolant.

Although, this depends on how long it’s been since the last time you changed your fluids. If the last time you changed your clutch and brake fluid was a month ago, and a few hundred miles driven, stick to changing the oil. My rule of thumb is I change everything before I put my bike away for the winter regardless if I had changed the fluids a month or two prior.

Changing fluids regularly is essential because they contain contaminants from regular usage, which become corrosive over time and can destroy rubber seals. In addition, the DOT4 brake fluid absorbs water and needs to be changed every two years.

Change the oil

The last thing you want is your motorcycle sitting idle all winter, filled to the brim with oil contaminated with solvents and sediments. It might not run if the bearings have been corroded or damaged.

Changing the oil is a vital and simple step to take to avoid forking out money down the road.

Tenderize the battery

How to store a motorcycle battery for winter? Some riders recommend starting their bike every week during the winter and letting it run.

A much better solution, however, is to clean the battery electrodes and hook them up to a battery tender (or trickle charger) for the entire duration of the winter. Not only should you use a battery tender during the winter—but one should be used all the time after each ride.

If you properly winterize your motorcycle battery, it will help extend the longevity of the battery.

Buy a FOB battery to have at the ready. For those that use a key Fob. Or use a Fob for add on LED glow lights.
While we are on batteries, if your bike won’t start in the spring, it may be for one of two reasons: you forgot your pin or need to replace your FOB battery.

There’s nothing you can do about it, but your FOB battery will attempt to communicate with your bike all winter. By the time spring rolls around, you’ll inevitably need to replace it.

You should keep one in the drawer of your tool box in your garage next to your bike. And carry a spare on your bike.

Check your tires

How long do bike tires last in storage? This largely depends on the respective tire wear going into storage and how the bike is stored.

In addition to checking for even wear on your tires, ensure they have enough tread remaining. Ensure the tires are not worn to the extent that the wear bars are exposed. If you have any questions, contact your dealer. Also, check their inflation with an accurate gauge.

Your owner’s manual and VIN label lists the proper tire inflation pressures. You can put your bike on front and rear stands, lifts, or dollies to keep your motorcycle upright all winter. This will also relieve pressure on the tires.

If you do not use a lift, move the motorcycle at least once a month to prevent flat spots on the tires.

Prevent rust: scrub, wash, dry, and wax
Start with the dirtiest part of your bike. That means the chain (if your bike is equipped with one) and brakes. You’ll want a grunge brush and an O-ring safe degreaser for your chain.

For your brakes, you’ll want a disc cleaner. Inspect everything while cleaning so that you don’t discover any surprises during the spring. After that, wash and dry your bike. You especially want to do this if you cover your motorcycle because any moisture on your motorcycle can cause corrosion and mold.

Lastly, Wax/ Polish/or Ceramic coat your paint and treat any chrome as well. This will add extra protection for your bike while it’s in storage. Plus, it’ll be spotless when you take your bike out in the spring.

If you have leather seats or any leather items, treat them as well.

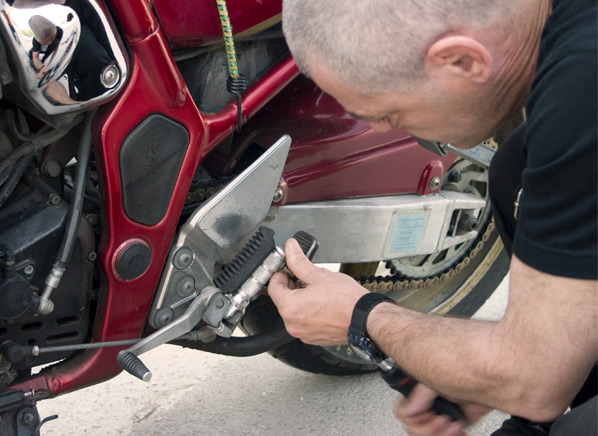
Wax and lubricate your chain if you have a chain drive.
Taking care of your chain before storage will extend its life.

Every 500 miles of street riding and every 200 miles of adventure/off-road riding should be followed by cleaning and waxing/lubricating your bike’s chain. Follow the guidance in your owner’s manual.

Begin by warming your chain with roughly five miles of riding. This will allow the lube to dissolve more effectively and enter the O-ring chain. Wipe off any unnecessary wax or lube.

Inspect the Belt Drive

Belt drives are cleaner than chain drives and require minimal inspection and adjustment. Before putting your bike away for the winter, inspect the inside and outside of the belt and look for chips, cuts, fraying, or missing teeth.

As is the case with a chain drive, proper tension is important. Be sure you consult the owner’s or service manual for the slack specification, measuring technique, and point at which to take the measurement.

Shaft drive basically zero maintenance. Check your owner’s manual for shaftdrive.

Prep the exhaust pipe

You’ll want to stuff any openings in your bike so that creatures don’t make their homes in them. This is especially important when keeping your bike outside or in a barn or shed. Or if you have holes or cracks in your garage where rodents can get in.

Some people use plastic bags for this purpose but spend the money on a muffler cover or any other product designed expressly for this purpose. Just remember to remove these items before your next ride.

Store on centerstand and/or stands if possible

If your bike has a centerstand, use it. But even better would be to get a motorcycle stand to keep both wheels off the ground.

This way, you don’t have to rotate the wheels to avoid flat spots. This motorcycle storage lift also prevents the suspension from working overtime and extends the suspension’s lifespan.

Use the correct cover
Should you cover your motorcycle?

While often used, a plastic cover is not the best motorcycle cover. It will trap moisture, potentially causing rust, corrosion, and mold. Instead, invest in an affordable, breathable cover.

Store in a well-ventilated area
The best place to store your bike is somewhere well-ventilated indoors. This way, air will circulate, and moisture or condensation won’t collect under your cover.

Just ensure there’s no fertilizer or chemicals around your bike since they can end up corroding your motorcycle.

What are common winterizing and storage mistakes?

Don’t start your bike up every week
Just turning your bike on in the garage isn’t a good idea.

If your bike is not brought up to the full operating temperature in cold temperatures, water may condense and end up in places where it doesn’t belong (when you ride your bike, the moisture gets cooked off, and your battery receives a recharge).
If you are one who likes to start your bike up in the winter to well just hear it. Start your bike and at least let it iddle for 20 minutes. This will then burn off any moisture.

Don’t drain your fuel tank

Don’t leave your gas tank empty unless you want it susceptible to corrosion and dried out seals. Instead, leave it full of gas and a quality fuel stabilizer additive. This is a vital step.

Without this treatment, the fuel turns into a crystalized, hard product and can clog carburetors and fuel injectors.

Don’t store a dirty bike

You’ll want to clean your motorcycle of road grit, grime, and bugs because they’ll eat away at any clear coat, anodized aluminum, polished metal finish, and stainless steel.

If you live in an area with salt or brine on the roads, you’ll also want to clean your bike since that’ll do a number on metal and rubber parts.

Before putting your bike away for winter, a final wash and wax is a good idea.

Don’t use a cheap cover or a tarp
You will want proper protection for your bike – especially if not stored in an enclosed storage unit. A poorly made cover may trap water, slip off, or chafe against the paint.

The result is that your bike will come out looking worse than when it went in.

Should I cancel my motorcycle insurance if I’m not riding in the winter?

There are several reasons not to cancel your motorcycle insurance policy during the winter months.

Warm winter days

While the seasons may change, unseasonably warm and clear winter days are perfect for a motorcycle ride. An uninsured ride, however, could expose you to an unforeseen incident and potential legal risk.

Don’t assume motorcycle thieves take the winter off either.

Unplanned damage while in storage
A significant winter storm, a fallen tree, or the possibility of fire should all be considered when evaluating the cancellation of your insurance policy. Remember, insurance is designed to protect you from unexpected and unplanned events. Without it, this type of incident may result in a total loss.

Common motorcycle winterization questions

Do you have to winterize a motorcycle?
Full winterization might not be necessary if you live in a region with mild winters and continue to ride your motorcycle regularly.

Still, it’s strongly recommended if you won’t be riding it for an extended period during the colder months, especially in areas where temperatures drop significantly or where there’s a lot of moisture.

Not winterizing can lead to various issues, such as:

Battery drain
Fuel degradation
Tire damage
Corrosion and rust
Oil contamination
etc.

Can you store a motorcycle outside in winter?

Yes, you can store a motorcycle outside in winter, but doing so presents challenges and potential risks to the bike’s condition. If you must store your motorcycle outside during the winter, take the following precautions to minimize potential damage:

Use a quality cover
Check on it periodically
Lift the bike off the ground
Choose a sheltered location
Cover exhaust pipes and air intake
Ensure your motorcycle insurance remains valid even if you aren’t riding it
How often should I start my motorcycle in the winter?
If you’ve properly winterized your bike, there’s no need to start it during the winter. It is recommended to avoid starting the motorcycle periodically through the winter if you’re not going to take it for a full ride, as short starts can introduce condensation into the engine and exhaust.

If you feel the need to start it, ensure you:

Let It Reach Operating Temperature: This helps burn off condensation and ensures the oil circulates thoroughly.

Ride It: Instead of just letting it idle, take it for a ride long enough to charge the battery and bring all parts to operating temperatures. This is often not feasible due to winter road conditions, but it’s the best method if you’re set on running the bike.

If you’re concerned about the battery, it’s better to remove it and keep it on a trickle charger or battery maintainer indoors.

Can you ride a motorcycle in winter?
Yes I used to be a very long time winter warrior.

You can ride a motorcycle in the winter, but it has increased challenges and risks. If you’re considering winter riding, here are some factors to consider and winter weather riding tips to follow.

Make sure you have the right winter gear on. The key is to stay warm. Keep the wind off of you. Keep an eye on the road conditions watch out for black ice and any salt clumps and slush. Try not to ride at night.

How much does it cost to store a motorcycle?

The cost to store a motorcycle varies depending on several factors, including location, type of storage, duration, and additional services or amenities offered.

Can I store the motorcycle in a storage unit during the winter?
Yes, storing a motorcycle in a storage unit during the winter is an option. If you don’t have a garage and prefer not to leave your motorcycle outside, opting for a storage unit offers protection from the elements, potential theft, and other potential damages. Here are some key features to look for if you are thinking of using a storage unit:

Cost
Security
Accessibility
Size of the unit
Ground protection
Climate-controlled storage
How to de-winterize a motorcycle?
When spring arrives, thoroughly check the bike before hitting the road to ensure everything is in good working order, including:

tire pressures
fluids
brakes
other systems
Refer to your motorcycle’s owner manual for specific requirements or recommendations.

The bottom line on winter motorcycle storage

If you live in a climate with a winter, you will have to store your bike. Luckily, storing a motorcycle for the winter is incredibly easy and something you can do independently after reading a manual, an article, or just watching a few YouTube videos.

If you go with a dealer to store your bike, they will take care of all the necessary maintenance to ensure your ride is ready when the weather improves.

But, if you want to go it alone, make winterizing your ride a yearly ritual so you can spend less time in the garage and more time on the road. See your motorcycle’s owner’s manual for additional instructions and steps when placing or removing your motorcycle from storage.

For those riders in the deep south or out west that don’t have to deal with the freeze of winter. Well just keep on riding LoL

Michael Theodore (Theo)
International President


Belt, Chain,Or Shaft?

Article is from Road Runner and Touring Magazine

Today’s motorcycles are offered with three major types of final drives: belt,chain, shaft. The final drive transmits power from the transmission to the motorcycle’s rear wheel. Each type has it’s advantages, and it’s important to choose the right final drive for your intended types of riding.
I have had all three dive systems on different bikes that I have owned.


BELT DRIVE
Belts are quiet and smooth in operation and don’t fling chain lubricant on the bike and rider, because they don’t require lubrication. A belt just needs a simple cleaning by hosing off dirt. Belts should be checked for cracks and other signs of wear during routine services. At that time the belt tension should also be checked and adjusted if needed. Special tools may be recommended by the manufacturer for tension checking and adjusting.
In general,belt final drives are not used on motorcycles designed for off-road use, because rocks and dirt can get between the belt and sprockets. This causes damage and in some cases sudden rear wheel lock up.
Belts usually have a long service life. For instance, Harley Davidson recommends drive belt replacement at 60,000 miles. However, when it comes time to replace them, it can be a considerable amount of work. For example, replacing the drive belt on a Harley Davidson requires the removal of the swing arm and primary covers. Changing final drive gear ratios can also be difficult and costly. The belt’s length matches the sizes of the stock pulleys. Therefore, if you change pulley tooth counts, the belt will likely need changing too. Belts are not cheap. However,over the life of a motorcycle, the cost compared with the cost of a chain drive machine’s chain and sprocket tends to balance out or even be less expensive.


CHAIN DRIVE
Chain drive is presently the most common motorcycle drive. Chain drive has low power loss and can handle high torque and shock loads well. Motorcycle chains are sold in two basic types: -O-ring (most common in today’s street motorcycles) and non -O -ring. The O-ring chains retain their lubricant internally because the O-rings seal it in between the side plates. Non O-ring chains require more frequent lubrication and adjustment, and generally don’t last as long as O-ring chains. “Therefore, non O-ring chains are best suited for slow speed and short distance machines, while O-ring chains are well suited to highway motorcycles.
Chains typically require replacement every 15,000 miles or so, although there are plenty of exceptions. If the chain needs frequent adjustment to remove slack, that’s a sign of wear. One way to check for wear is to pull out on the chain at the very rearmost point on the rear sprocket considerably, its a sign of wear and looseness in the links.
When it comes time to replace the chain, carefully inspect the sprockets for wear and hooked teeth. It’s best to replace the chain and sprockets at the same time for longest service life. With chain drive, owners chain change ratios easier than with other drives. Sprocket ratios can be changed to reduce engine rpm at road speed, or increase revs for greater acceleration and hill climbing ability. Unfortunately, chains require more maintenance and have the shortest life span compared with belt and shafts. Special chain cleaning tools and chemicals along with chain lubricants, should be used to maintain the chain and sprockets and extend the service life. Chain tension also should be checked regularly and adjusted according to instructions in the owners manual. Chain life depends on its quality, how it’s cared for, and how it’s used. It’s worth noting that it’s better to keep a chain clean then to over lubricate it, which can cause the chain to attract more grime, wearing out the seals prematurely.


Shaft Drive
With shaft drive, torque is delivered to the rear wheel via a short drive shaft, much like in a rear wheel drive car. A pinion gear drives a ring gear, to turn the direction of drive by 90 degrees again, like a rear drive automobile. The gear type final drive is bathed in gear lubricant, which is sealed to keep it clean and contained in housing. Shaft drives are quiet and require little maintenance in normal use, and this is probably their best feature. The final drive lubricant level should be checked at every oil change service and changed during major service intervals as listed in the manufacturer’s maintenance schedule. If there is no listing, it’s a good idea to change lubricants every 25,000 to 30,000 miles. Shaft drive cost more initially when the motorcycle is built, and can be quite costly if major parts break, particularly after the warranty expires. Changing gear ratios also can be expensive,and therefore could be impractical in many cases.

Final Thoughts on Final Drives
As you can see, each type of final drive has its benefits and liabilities, which is why all three types continue to be manufactured. Belt drive will transfer 95% of the power applied to it, a chain can transmit up to 98% of the engine’s power,and a shaft drive is around 80% to 85% efficient. These percentages can vary. hen it comes time to shop for that next new motorcycle, consider which type of drive is best for you as part of your buying decision.

Keep the contact patch between the lines
Michael Theodore
National Public Relations Coordinator

Ten Simple Steps to Winterize Your Motorcycle

I have posted this article on winterizing a bike the last few years here. Hope it still helps someone.

1) Surface Prep

Washing your bike when nobody will see it for a few months anyway can be a drag, but giving your bike a thorough cleaning before storage is important When you let bug guts or water spots or dirt spots sit on your paint over the winter can corrode the finish permanently. Wash your bike and dry it completely to get all the moisture off the surfaces. You can use an electric or gas leaf blower  to get all the nooks and crannies completely dry.
Add a coat of wax, which will act as a barrier against moisture and rust. Finally, spray exposed metal surface with WD-40 to displace all moisture (fun fact: the WD in “WD-40” stands for water displacement) and to give them a protective coating against corrosion.

2) Change Oil and Filter

Change your oil and filter. It’s better for your lubrication system to have fresh oil sitting in it for several months than to have used, broken down oil in it, not to mention the last thing you’ll want to do when riding season begins is change the oil before you can go ride. Using a winter weight oil like 5W30 can help it start up easier come spring time as well.
If you’re going to be storing your bike for a long time (4-6 months or more) you will want to protect your engine’s internals against moisture by coating them lightly with oil. You may not be able to see it with your naked eye, but the cold winter air is perfect for moisture to gather in your engine and cause rust to form on your pistons and cylinder walls.
In order to do this, remove the spark plugs and put a little squirt (about a tablespoon) of engine oil into the holes, then turn your engine over a few times to coat the cylinder walls by spinning the rear wheel with the bike in gear. Once everything is coated, replace the spark plugs.

3) Lube Moving Parts

Keeping moving parts lubed up during the winter. This will help keep moisture from building up on them and causing any rusting or binding. Any part of your motorcycle that needs to be lubed at any point should be lubed again before storage. Some parts to check are: chain drive, cables, controls, fork surfaces, and any other pivot points.
 

4) Prep Fuel System

Gas tanks have a tendency to rust when not in use, and untreated pump gas breaks down and becomes gummy over time. To prevent rusting and make sure your fuel is ready to run after a few months in storage you will want to fill your tank completely with fuel treated with a product like Sta-Bil or Sea Foam both are great Fuel Stabilizers.
On your last ride of the season before you plan on storing your bike. Stop at the gas station nearest to where you live and add the proper amount of fuel stabilizer then top off the tank with a full tank of fuel. This will keep moisture from building up on the tank walls and adding the stabilizer before the short ride home will help mix the gas and stabilizer together and run it through your fuel system before storage.
 

5) Safeguard Battery

Batteries have a tendency to self-discharge when sitting over time, especially when they remain hooked up to the bike. The easiest way to combat this is to hook up a battery tender like the ones that uses smart technology to monitor the charge and keep the battery topped off without overcharging. Normally you should pull the battery from the bike for storage, but with a smart tender you can also connect the tender with the battery left in the bike. Before doing this, make sure the electrodes are clean and corrosion free if necessary clean them off and give them a light coating of grease.

6) Protect Tires

If your tires are left to sit in the same position all winter long, they could develop flat spots. Keeping the tires off of the ground will prevent this, so if you have a motorcycle stand/Jack you can put the bike up on them for storage. If you don’t have stands try to get at least the rear tire off the ground, or you can rotate your tires by rolling your motorcycle slightly every few weeks. If you need to leave your tires down on concrete put a piece of carpet or plywood under them to keep any moisture from seeping into them.
 

7) Check Coolant/Anti-freeze

If you are storing your bike somewhere that gets below freezing, make sure you have adequate levels of anti freeze in your coolant system. This is very important; if you run straight water in your coolant system and it freezes, you could come back to a cracked head in the spring!

8) Plug Out Pests

Mice and other rodents are notorious for hiding from the cold inside exhaust pipes and making homes out of air filters. In order to avoid any furry surprises when it’s time to ride again plug up your pipes with an exhaust plug. Or you can also simply stuff your air intake and the ends of your exhaust with some plastic bags – but do use bright colored bags or tie something to them so you don’t forget to take them off when you fire up the bike!

9) Keep it Covered

With your motorcycle fully prepped for winter, invest in a proper quality motorcycle cover. It will not only keep dust off the bike, but will keep the moisture out so it doesn’t get trapped underneath it, and create corrosion or rust. If you’re storing it outside, be sure to get a cover with tie downs to prevent it from blowing loose in wind. If you’re storing it inside you’re in much better shape, but you should still use a cover to prevent dust from building up on it.

10) Theft Protection

If you’re storing your bike outside, bear in mind that being parked unattended for months at a time makes it an easy target for theft. In addition to protecting your bike from weather, using a cover will conceal it from view, and securing it with a heavy lock and chain can give you some peace of mind. If you are going to  be storing your bike anywhere it can be accessed by others consider investing in some security measures.
Michael Theodore                                                                                                                  National Road Captain

ASR Store Temporarily Closed

The ASR store will be temporarily closed. If you need to order anything please contact me through my e-mail laureen.theodore@azusastreetriders.com, cell phone 330-720-4382 or private message. Thank you for your patience while we update our products and payment system. We will be up and running again as soon as possible. I am looking forward to riding with you all and excited to see what the Lord is going to do for us and through us as we join together for fellowship and outreach. Love and blessings to all of you! Sis Laureen Theodore (International Treasure)

Top 10 Motorcycle Maintenance Fails


1. Not Maintaining Proper Tire Pressure

Motorcycles, cars, trucks, you name it—there are millions of vehicles out on the road with under-inflated tires, which reduces gas mileage and makes the tires run hot, shortening their life span. (You can also over-inflate tires, but it’s less common.) Some people check their tire pressure before every ride—not a bad idea, especially if you’re on a multi-day tour—but do it at least once a week or at every fill-up. Check your tires when cold, use your own tire gauge (keep one in your toolkit or saddlebag) and follow inflation guidelines printed on the VIN plate on your bike or in the owner’s manual. When checking tire pressure, also inspect for foreign objects that may be stuck in your tires and for signs of wear or other damage.

2. Wasting Money on Premium Fuel When Your Bike Doesn’t Need It

Your bike’s owner’s manual  or a sticker on the fuel tank will tell you the minimum octane fuel (PON, or pump octane number) that your motorcycle requires. Many of today’s motorcycles require premium fuel (typically 90 PON or higher), but some modern motorcycles and many older ones require only regular fuel (usually 86 or 87 PON). Running lower-than-recommended octane fuel is very bad; it can cause detonation (knocking) and potentially damage the engine. Running higher-than-recommended octane fuel wastes money at the pump (don’t fall for the gasoline companies’ marketing about high-octane fuel being “better”; it won’t boost performance and the EPA requires all fuel grades to have engine-cleaning detergent additives), and it can reduce gas mileage.

3. Not Regularly Checking and Changing the Oil

All internal combustion engines have reciprocating metal parts that require proper lubrication to reduce friction and heat. Some engines, especially older ones with worn seals, gaskets and piston rings, will consume oil, either by burning it up in the combustion chamber or simply leaking out. Get in the habit of checking your oil level—some motorcycles have sight glasses, others have dipsticks—every time you fill up the gas tank. And refer to your owner’s manual for the recommended oil change interval (in miles and/or months). Oil filters collect dirt, debris and metal particles, so make sure to install a new oil filter when you change the oil

4. Forgetting to Clean, Lube and Adjust the Chain

If your motorcycle has chain final drive, neglecting to clean, lubricate and adjust the chain is asking for trouble. (Drive belts don’t need to be lubricated, but they should be regularly inspected for wear and proper adjustment.) If you have an older bike it may have a non-sealed chain (which requires more care and maintenance), but most contemporary motorcycles have O-ring chains, which have small rubber O-rings between the link plates and rollers that help keep lube in and dirt out. Most owner’s manuals recommend lubricating the drive chain every 400-500 miles, but if you ride in wet or dirty conditions, you should lube the chain more often, perhaps every day. If possible, before adding lube, clean the chain with a non-wire brush and mild soap. Lubricate the chain after a ride, when the chain is warm, to help the lube penetrate the small spaces between the O-rings, plates and rollers, and use a dedicated motorcycle chain lube, such as Spectro Oils Z-Clean Chain Lube. With the bike in neutral and up on its centerstand or a rear-wheel paddock stand, spin the rear wheel forward and spray the lube on the top of the lower chain, just before it comes in contact with the rear sprocket. Wipe off any excess and spin the rear wheel a few more times to help the lube work its way in. Once the chain has been cleaned and lubed, check for proper chain tension, make any necessary adjustments and check the chain and sprockets for wear.

5. Not Using Fuel Stabilizer or Draining the Carbs During Short-Term Storage

Those of you with fuel-injected bikes, count yourselves lucky and move on. But if your motorcycle has carburetors and it sits for more than a couple of weeks between rides (hello, winter!), it’s teeny-tiny jets and other parts can become clogged or gummed-up by old fuel that breaks down over time and creates sticky varnish. Regularly using a fuel stabilizer such as StarTron and draining the carburetor’s float bowl after a ride when the bike will be parked for a while (the easiest way is to turn the fuel off and let the bike run in neutral until it conks out) are the best ways to protect your carbureted fuel system against the scourge of today’s ethanol-blended gasoline.

6. Forgetting to Lube and Adjust the Throttle, Clutch and Brake Cables

The control cables that actuate the throttle, clutch and brakes are absolutely critical components that are often overlooked, a simple matter of “out of sight, out of mind.” A sticky cable that doesn’t move back and forth properly can be dangerous, and a broken cable can leave you stranded in the middle of nowhere. According to Motion Pro, which makes a wide variety of motorcycle tools, cables and controls, motorcycle control cables should be lubricated and adjusted at least once per riding season and more frequently for dual-sport and off-road bikes that see much more wear and tear.

7. Not Using a Battery Maintenance Charger

Even if your bike is parked safely in the garage, over time its battery will self-discharge. Allowing the battery to discharge can lead to sulfation—the build-up of lead sulfate crystals—which can result in a loss of cranking power (your bike won’t start), longer charging times and, ultimately, shorter battery life. The best way to keep your motorcycle’s battery healthy is to use a smart maintenance charger such as a Deltran Battery Tender. It has “microprocessor controlled power electronic circuitry” which enables it to perform and control various charging functions, including battery testing, bulk charging and float/maintenance charging to keep the battery in optimal condition.

8. Not Checking and Changing the Final Drive Oil

Many touring riders love motorcycles with shaft final drive because of their cleanliness and low maintenance. Although heavier than chain final drive, shafties don’t fling chain lube onto the swingarm or rear fender and they don’t need to be adjusted or replaced like chains and sprockets. But the gears inside shaft drives are lubricated with oil that needs to be checked regularly (in case there are leaks or it has become contaminated) and changed according to the recommended service interval in the owner’s manual. Most riders go a long  interval to easily forget about or ignore Checking the final drive oil. The consequences can be very costly—replacing a damaged final drive is much more expensive than replacing a chain and sprockets.

9. Not Changing the Brake Fluid

This is another one that’s easy to overlook. Hydraulic brakes work extremely well, especially modern triple-disc systems with ABS, but for brakes to work properly the hydraulic fluid must be changed regularly. Glycol-ether (DOT 3, 4, and 5.1) brake fluids are hygroscopic, which means they absorb moisture, which contaminates the fluid over time. Most motorcycle owner’s manuals  recommend changing brake fluid every two years and replacing the brake hoses every four years. Sticking to these service intervals, as well as checking and replacing your brake pads as needed, are critical for the safe and optimal operation of your motorcycle.

10. Not Reading the Owner’s Manual

There are a lot of references to this list because your motorcycle owner’s manual is an important source of maintenance information. Very few people read their owner’s manual cover-to-cover, but it’s a good idea to at least flip through it and become familiar with its contents. Most owner’s manuals have sections on safety, general information, specifications, routine maintenance/adjustment, troubleshooting, warranty information and a maintenance/service log. Your owner’s manual contains information about proper tire pressure, fuel type, checking and changing oil, load capacity, suspension settings and much more. If possible, keep your owner’s manual on your bike (under the seat or in a saddlebag), sealed in a durable plastic bag. Buying the service manual for your particular model is also a good idea; keep it in your garage with your tools for handy reference.
Michael Theodore
National Road Captain

Ten Steps to Winterize your Motorcycle

how-to-winterize-your-motorcycle-1

Ten Steps to Winterize your Motorcycle


If your idea of storing your bike for winter is just throwing a cover over it, you may be in for some nasty surprises come spring time. The last thing you want to find out when riding season starts is that your bike won’t, so use these tips to make sure your bike is as ready as you are when it’s time to ride!

We may not want to admit it, but winter is just around the corner. And as the air cools off and the snow starts falling, most of us riders store our bikes and impatiently wait for spring to ride again.

But storing your bike in the winter isn’t as simple as just throwing a cover over it and hopping in the car. In order to keep your motorcycle in top running condition, there is some work that needs to be done before storing it for several months (talk about adding insult to the injury of not being able to ride!)

However, if you properly get your bike ready for winter storage, it’ll make getting it  running again when the riding season begins a whole lot easier, and prevent any unwanted surprises such as dead batteries, corrosion, and rust spots (or worse.)

Depending on what kind of motorcycle you ride there may be different things that will need to  addressed. But there is some general wisdom on how to get it ready to be stored for the winter. Your main enemy during winter storage is damage from moisture, so most of our winterizing efforts will be aimed at keeping that away from your bike. In addition, well give some love to your fuel system, battery, tires, and all your moving parts as well.

With just a little prep work using these ten simple steps, you’ll save yourself a lot of time and hassle come spring time, and your bike will be ready to hit the road as soon as you are!

1) Surface Prep

Washing your bike when nobody will see it for a few months  can be a drag, but giving your bike a thorough cleaning before storage is important; letting bug guts or water spots sit on your paint can corrode the finish permanently. Wash your bike and dry it completely to get all the moisture off the surfaces (an electric leaf blower is a great way to get all the nooks and crannies really dry.)

Add a coat of wax, which will act as a barrier against moisture and rust. Finally, spray exposed metal surface with WD-40 to displace all moisture (fun fact: the WD in “WD-40” stands for water displacement) and to give them a protective coating against corrosion.

2) Change Oil and Filter

Change your oil and filter. It’s better for your lubrication system to have fresh oil sitting in it for several months than to have used, broken down oil in it, not to mention the last thing you’ll want to do when riding season begins is change the oil before you can go ride. Using a winter weight oil like 5W30 can help it start up easier come spring time as well.

If you’re going to be storing your bike for a long time (4-6 months or more) you will want to protect your engine’s internals against moisture by coating them lightly with oil. You may not be able to see it with your naked eye, but the cold winter air is perfect for moisture to gather in your engine and cause rust to form on your pistons and cylinder walls.

In order to do this, remove the spark plugs and put a little squirt (about a tablespoon) of engine oil into the holes, then turn your engine over a few times to coat the cylinder walls by spinning the rear wheel with the bike in gear. Once everything is coated, replace the spark plugs.

3) Lube Moving Parts

Keeping moving parts lubed during the winter will help keep moisture from building up on them and causing any rusting or binding. Any part of your motorcycle that needs to be lubed at any point should be lubed again before storage. Some parts to check are: chain drive, cables, controls, fork surfaces, and any other pivot points.

4) Prep Fuel System

Gas tanks have a tendency to rust when not in use, and untreated pump gas breaks down and becomes gummy over time. To prevent rusting and make sure your fuel is ready to run after a few months in storage, you’ll want to fill your tank completely with fuel treated with a product like Sta-Bil Fuel Stabilizer  Star brite Star Tron – Enzyme Fuel Treatment

On your last ride of the season, stop in at the gas station nearest to where you will be storing your bike and add the proper amount of fuel stabilizer, then top off the tank. A full tank will keep moisture from building up on the tank walls, and adding the stabilizer before the short ride home will help mix the gas and stabilizer together and run it through your fuel system before storage.

Note: Another method that some some do is to drain the tank and fuel system completely. This is more troublesome to do, and requires that you treat the inside of the tank with fogging oil to prevent rusting. This method may be preferred for very long-term storage (6 months or more), but for winter storage, a full tank of treated fuel is easier and completely safe to do for both carbureted and fuel-injected bikes.

5) Safeguard Battery

Batteries have a tendency to self-discharge when sitting over time, especially when they remain hooked up to the bike. The easiest way to combat this is to hook up a battery tender like the Battery Tender Super Smart Junior which uses smart technology to monitor the charge and keep the battery topped off without overcharging. Normally you should pull the battery from the bike for storage, but with a smart tender you can also connect the tender with the battery left in the bike. Before doing this, make sure the electrodes are clean and corrosion free; if necessary, clean them off and give them a light coating of grease.

6) Protect Tires

If your tires are left to sit in the same position all winter long, they could develop flat spots. Keeping the tires off of the ground will prevent this, so if you have motorcycle stands, put the bike up on them for storage. If you don’t have stands, try to get at least the rear tire off the ground, or you can rotate your tires by rolling your motorcycle slightly every few weeks. If you need to leave your tires down on concrete, put a piece of carpet or plywood under them to keep any moisture from seeping into them.

7) Check Coolant/Anti-freeze

If you’ll be storing your bike somewhere that gets below freezing, make sure you have adequate levels of anti-freeze in your coolant system. This is very important; if you run straight water in your coolant system and it freezes, you could come back to a cracked head in the spring!

8) Plug Out Pests

Mice and other rodents are notorious for hiding from the cold inside exhaust pipes and making homes out of air filters. In order to avoid any furry surprises when it’s time to ride again, plug up your pipes with an exhaust plug like the Muffler Plug. You can also simply stuff your air intake and the ends of your exhaust with some plastic bags – but do use bright colored bags or tie something to them so you don’t forget take them out when you fire up the bike!

9) Keep it Covered

With your motorcycle fully prepped for winter, invest in a proper motorcycle cover. A quality motorcycle cover will not only keep dust off the bike, but will keep the moisture out so it doesn’t get trapped underneath it, and create corrosion or rust. If you’re storing it outside, be sure to get a cover with tie downs to prevent it from blowing loose in wind. If you’re storing it inside you’re in much better shape, but you should still use a cover to prevent dust from building up on it.

10) Theft Protection

If you’re storing your bike outside, bear in mind that being parked unattended for months at a time makes it an easy target for theft. In addition to protecting your bike from weather, using a cover will conceal it from view, and securing it with a heavy lock and chain can give you some peace of mind. Make sure to add some sort of lock or alarm on your bike there are many different aftermarket alarms for bikes out there.

With your bike fully prepared for a few months of hibernation, you’ll find that the winter is the perfect time to get done any maintenance or upgrade projects that you’ve had on your mind. You may not be able to ride in the snow, but nothing is stopping you from getting your hands a little greasy and actually starting one of those projects that you’ve been thinking about all season!

Michael Theodore

National Road Captain


Get Your Bike Ready For Summer

cyclone 

After sitting for months motorcycles need attention before returning to service, which can also help avoid breakdowns and ensure safety. Refer to the owner’s and service manuals for inspection lists before giving your bike a thorough going over.

Look for any signs of leakage, such as stains underneath that indicate problems. Check steering head bearings for looseness or binding. To get the best performance out of a hydraulic fork change the fluid every year or two.

Clean the battery terminals. Check the electrolyte level (if caps are removable) and add distilled water as needed. (Warning: Electrolyte contains acid so avoid contact and wear eye protection. Baking soda and water will neutralize the acid.) If the battery wasn’t on a maintenance charger it’ll probably be weak or dead. Turn on the ignition briefly and note how bright the lights are. If the lights are dim or don’t work, charge the battery. If the battery was fully discharged it’s likely sulfated and needs replacement.

Unless you put in fuel-stabilizer additives before storage, after several months the gasoline may begin to form deposits in carburetor jets and passages, and may also clog injectors and electric fuel pumps. Remove the gas cap and peer into the tank with a small flashlight (switch it on first to avoid sparks), look for rust in steel tanks, and note if the fuel has sediment or other contamination. Give the gas a quick sniff. If it smells like old varnish the fuel system may need to be drained, flushed, and the fuel filter replaced. Carburetor float bowls (if equipped) must also be drained before new gas is added. If a motorcycle won’t start because the fuel system is gummed up it may require disassembly and a thorough cleaning.

Check the oil level and note the color of the oil, as old, dirty oil leaves sludge and deposits in the engine. If it is dark or the level is low change the oil and filter before starting the engine. If the oil isn’t too bad it’s better to start the engine and allow it to warm up to allow contaminants to be suspended in the oil, and then drain it. If your motorcycle has a separate transmission or primary-chain case oil supply, service that, too. Always recycle used oil and dispose of filters properly.

Inspect tires for cracks, wear, and damage. Tires more than about five or six years old should be replaced even if they aren’t worn out. After a thorough inspection inflate the tires to the recommended pressure in the owner’s manual.

Check your maintenance records and schedule to determine if the motorcycle is due for a major service, including a tune-up and valve adjustment. If not it’s still a good idea to check the spark plugs for condition and measure the gap. Put a little anti-seize compound on the threads and torque properly – do not over-tighten them. Inspect the plug wires and boots and clean or replace them if they look worn or cracked. Also check the air filter and replace as needed.

Liquid-cooled engines should have the antifreeze/coolant checked, flushed, and replaced every two years, as old coolant causes corrosion. Also replace the hoses, thermostat, and radiator cap every five years. After starting the engine test the operation of the electric cooling fan. It should come on during extended idling.

Inspect the brake linings and rotors or drums for wear. Check the brake fluid, which should be changed every two years, and if it looks dark replace it. Refer to the shop manual for the bleeding procedure, especially on ABS systems.

Control cables should be serviced every year. Check the throttle cables and clutch cable (if equipped) for free travel and lube with special cable lubricant.

Inspect the sprockets and chain (if equipped) and make sure they are properly lubed and adjusted. Belt drives and sprockets should be inspected and adjustment checked. Shaft-drive machines should have the gear lube level checked and changed if it has been several years since this was done.

Start the engine and allow it to warm up gently without revving. After the engine is up to normal operating temperature, check the idle speed and adjust if needed. Test all controls, lights, and accessories to ensure they’re working properly. Addressing these items before you ride can save a lot trouble down the road.

Michael Theodore
Azusa StreetRiders National Road Captain


Motorcycle Storage: 7 Ways to Keep Winter from Trashing Your Ride

winterizing_motorcycle

Few things beat cruising down the highway on a warm summer day, but during winter your motorcycle isn’t exactly the most convenient way of dashing through the snow. While your bike is in storage for the season, it’s important not to give it the cold shoulder. Maintaining your motorcycle while you’re not riding it is just as important as when you are. Read more details here: Motorcycle Storage: 7 Ways to Keep Winter from Trashing Your Ride.